Archive | Fabric Stores RSS feed for this section

Cutting Line Designs “A New Dimension” Part 2

29 Jun

It’s beginning to get hot in the sewing room, which means I need to turn on the air conditioning.  I’m pretty stingy with the air, since we live in a fairly moderate climate, but I can’t let that keep me from my sewing, so the air must go on.

I just finished the second version of A New Dimension.  Just to spark your memory, here is the envelope cover:

A New Demension

Here is my version:

I made the longer version this time – the one with the cute collar.  This collar is made by fusing the interfacing in three sections with space between so that you can fold and iron the collar as shown on the envelope cover.  I did it that way, but then I decided I like the collar unfolded A LOT, so I left it that way.  In the future, if I want to change the collar, I can easily do that.

I used the extra small sizing, and there is still plenty of ease in the final jacket.  I made no other alterations except to shorten the length.

I cut a bunch of inches off the length (can’t remember right now, but I’m going to say something like seven).  Because I cut off so much, I made sure I did that at the lengthen/shorten line.  I was still worried about losing the proportions, but I don’t think I did.   I generally don’t look good in a long jacket style, and my intention was to make this a “big shirt” type of jacket.  I think it turned out to have a “swing jacket” vibe.

I used a stretch cotton bottom weight that I got from Marcy Tilton.  It will be a nice layering piece for summer evenings, spring, and fall.  I didn’t put in the pockets, since I’m not much of a pocket girl.

I liked both versions of this pattern, and will probably make it again (especially the last version).  A plus is that THE DONALD (DH) likes it. : )

Travel Clothes 2013

14 Jun

We just got back from Spain, and I wanted to share with you my travel wardrobe.  I was very pleased with what I took this time.  Everything fit in one carry-on size bag (which I can’t carry on because of the dang liquid restrictions).  I don’t know how TSA thinks a woman of a certain age can possibly go on a two week trip with the bottles of liquid one can fit in a quart-size baggie!

I have learned over years of traveling that knits are the easiest to wear, pack, and launder while on the road.  They are comfortable, they fold to nothing, and I can wash them in a hotel sink with Eucalan, a great product that you don’t have to rinse out.  Knits dry pretty fast (it depends on the knit, of course).

I started the travel wardrobe by participating in Elizabeth’s Spring Six-PAC on Stitcher’s Guild.  Here is my completed Six-PAC:

Image


Okay, now for pattern numbers, clockwise from top left:  The white top is a frankenmorph of Katherine Tilton’s Vogue 8710 and Vogue 1261.  Vogue 8710 goes to just below the bustline.  The blue top to the right of it is the same frankenmorph.  The only difference is that the pleats on the sleeves are folded inwards instead of outwards like the white top sleeves.  The blue top on the dummy is Vogue 1261 without sleeves.  The gray top is Katherine Tilton’s Vogue 8817.  The blue top on the hanger is Marcy Tilton’s Vogue 8582 (OMG, it’s out of print – when did that happen).  Both of the pants are a modified version of The Sewing Workshop Hudson pants.  I have slimmed them down a bit.

So, that’s 5 tops and two pairs of pants.  You can’t tell from the picture, but the pants are black and brown.  They are made from that indestructible Parisian microfiber knit that Marcy Tilton sells.  I can’t rave enough about this fabric for travel.  I wore these two pairs of pants almost daily on my trip, washed them in Eucalan, hung them to dry (which they easily do overnight), and put them back on again (no ironing).  They are lightweight and cool for a hot climate, as well.  This fabric won’t work for cooler climates.

Those two pairs of pants, and about 10 knit tops were my key wardrobe pieces for two weeks of travel.  Yes, I did take a rain jacket, some shorts for a bike trip, and two lightweight sweaters (one black and one camel) as layering pieces.  Also, I made two dresses out of the microfiber knit and took them as well.

Here are some random pics of me in my travel wardrobe on the trip:

ImageImageImageImage

IMG_0137One thing I noticed from these pictures:  As much as I love the crossbody bag for travel, it really isn’t the best look, is it?  I’ll probably continue to use a crossbody, but I might try one with a thicker strap and see how that looks.

We had a wonderful time in Spain.  The people are very friendly, the food is good, and weather was fabulous.  The culture is interesting, so what’s not to like?

Vogue 8804 – Chanel Style Jacket

27 Sep

It’s been awhile since I’ve had anything happening in the sewing room that I felt was blog-worthy.  Now, however, I have an EPIC project that I want to document and share.  It’s the new Claire Schaeffer, Chanel style jacket sans motorcycle helmut and leather gloves:

It’s an epic project because of the preparation and sewing techniques involved.  My goal is to greatly improve my sewing skills during the construction of this jacket.  Hope springs eternal.

I bought the fabric during a wild shopping moment in London.  Don’t ever go to Joel & Son unless you want to unload some cash!  It IS a wonderful fabric store, but I’m glad it isn’t located in my town!  The fabric is a beautiful pewter gray boucle with “Chanel” written all over the selvedge.  I don’t really know what that means, except that perhaps the fabric was made for Chanel?

I purchased the lining at this shop, as well.  It’s a gray stripe silk – a beautiful piece that will look perfect with the boucle.

It took several weeks to accumulate the notions and trims, especially the trims.  Here is what was needed:

I had to get silk thread in this exact, sort of odd gray color, silk buttonhole twist in the same color, 1/4″ cotton woven stay tape, gold chain, buttons, interfacing and trim.  Most of that had to be ordered online, since there were no stores in my area that carried these items.  For the trim, I took some of the fabric apart and made a braid.  I made two other braids with some lighter and darker mohair, then I plaited the three braids together.  If I use this braid, I will put a black petersham ribbon under it, since I can’t find a gray ribbon to match.

The other option for the trim, and one I am favoring at the moment, is to fringe the boucle and use that as the trim.  The fringe on the boucle is really pretty, as you can see in the picture, so that may be the one.

I have just finished cutting out and marking the boucle.  Here are the pieces:

Now I am ready to cut out the lining and interfacing.  I am a very slow sewist as it is.  This will take some time, and I intend to enjoy the process.

Travel Wardrobe – Finished

17 Apr

The title is a bit tongue-in-cheek, because the travel wardrobe isn’t finished until the suitcase is zipped shut for the final time, but at least I can say the Spring Six-Pac is finished.  This is probably the best collection I’ve ever put together, simply because each piece goes with other pieces in my closet.  I learned a lot about combining colors, and especially about Nanette Lapore’s “column of color”.

Simply stated, the column of color is the anchor of a collection.  Besides being slimming, it offer the opportunity for throwing just about anything in your closet (especially if you are working within your personal color zone) over the top to create an entirely new look.

I extended the column of color to include a draped cardigan in the same fabric.  I figured it would offer lots of mix-and-match opportunities.  I will say that I have finally come to the conclusion that a draped cardi is not for me.  This one is the StyleArc Abby cardi, and it is good as far as draped cardis go, but I’m just not crazy about the look.  I will wear this one, though.

Here is the collection:

From left to right, the Abby Cardigan from StyleArc, the Creative Cate top (under the cardi) from StyleArc, Vogue 8435 raglan sleeve top, The Sewing Workshop Quincy top without pleats at the bust, another Vogue 8435 top, Cutting Line Design Discover Something Novel pants, and finally, Annie’s Cami from StyleArc.

The missing piece here is the Vogue 8435 skirt made from the same fabric as the Quincy top (a wonderful rayon tencel from Marcy Tilton).  I didn’t have enough fabric and had to order some more (actually, I think I accidentally threw a piece away, but that’s another story).

The scarf was a bit of serendipity – a piece of silk from my stash that I had purchased long ago to make a scarf, but never did.

By the way, I love, love, love the Quincy!  I intend to figure out how to make it without the zipper, either with one large button at the top or no buttons at all.  I like it without the pleats, and got the idea for that from TerriK on Stitcher’s Guild.  Thanks Terri!

I’m off to a spa in Utah next week for 3 days with a dear friend of mine.  I am so looking forward to it.  I’m sewing a couple of tops and some pajamas that I will post about later.

Here are two more pictures of the collection:

Travel Wardrobe 2012

7 Mar

I have decided that I am hopeless at blogging, mainly because when I get stuck in my sewing, I get stuck in my blogging, as well.  That makes for a fairly sparse blog.  Here is a brief update:

The Koos jacket is still unfinished.  I decided somewhere along the way that it is NOT my style.  This was one of the best sewing failures I’ve ever had, in terms of what I learned:  I cannot wear clothes that don’t fit around the shoulders.  Forgive me if I am repeating myself, but I really have no shoulders to speak of; therefore, anything loose-fitting around the shoulders makes me look like I’m playing dress-up in my mother’s clothes.

The Koos jacket sat on my dress form for months, while my sewing and blogging languished.  I finally said to the Koos jacket, “Off with your head!”  It is now folded up in a corner of my sewing room…resting.

In the meantime, I have started my travel wardrobe for 2012.  In August, we are visiting family in Stockholm, and then taking a side trip to Budapest.  It will be very hot in Budapest, so I’m going for a very cool and casual wardrobe, which for me means loose-fitting and light-weight.

I’ve been working on this “packing for travel” thing for a long time, and have decided that knits are the way to go.  They are cool and comfortable, they pack light and fold to nothing.  I can wash them in the sink and hang to dry.  Knits are really perfect for a travel wardrobe.

My travel wardrobe will look something like this for a two-week trip:

1.  7 knit tops

2.  2 knit pants

3.  1 skirt

4.  1 or 2 knit overlayers (shirt or cardigan)

Marcy Tilton has some wonderful fabric she calls “Paris microfiber knit” that I used last year on some casual pants.  I loved the ease of wear of this fabric, so I bought a ton of it for this year’s travel wardrobe, both in black and gray.  Here is what I have come up with so far:

Here, I am following Nancy Nix Rice’s idea of a column of color as a base.  This will make me look taller and thinner…maybe : ).  The top is the StyleArc’s Annie’s Cami and the pants are Cutting Line Design’s Discover Something Novel.

I threw a Babette blouse from my closet over my shoulders, and viola, an outfit:

Then I made this StyleArc Creative Cate top to go with the pants:

Finally, I added this StyleArc cardigan to the mix:

The cardi is not hemmed in this picture, but you can see that I’m working my way to a functional summer travel wardrobe.

Vogue 8634…again

28 Nov

While I’m waiting to begin the Koos jacket, which is part of my winter 6 pack, I decided to make another top from this pattern.  If you remember, I made this top in a wild and crazy (for me) rayon knit for the 6 pack.  I really loved the way it turned out, so I decided to use my precious Missoni knit from Emma One Sock to make the next one.  This is not a top-of-the-line Missoni.  It is polyester, which I really hesitated to buy, but I’m so glad I did.  It really doesn’t have a poly feel.  You would probably guess that it is a cotton/rayon type knit.

The knit is fairly loose, so I decided to reinforce on the front and back shoulders (since it’s a raglan sleeve) and along the neck edge:

I had to lower the horizontal seam on the bodice. I think anyone who isn’t very flat-chested would have to do the same. Otherwise you will end up with a seam running across the middle of your boobs. I lowered the seam by 2 inches, which might have been a bit much, but it looks fine. Here is the finished top:

This is a comfortable top and I will probably make it again.  I especially like it in the sweater knit, because it works with a “beefier” fabric.

My focus this week is in finding the chocolate binding for my Koos jacket, and altering some clothes, since weight loss has me looking baggy and saggy these days.

Koos class starts on Thursday :).

Visiting NYC and the Garment District

26 Nov

My husband, “The Donald”, travels for business, but usually doesn’t go anywhere very thrilling.  When he said he was going to New York, though, I was all over it.  I needed some fabric for the Koos jacket that I will be making in a class beginning December 1, so I thought this would be a great opportunity to see the Garment District AND pick up some cool fabric for the coat.  Here are some scenes from the district:


Mood was a must on my travels, but it was hard to find.  If you are ever in the area, looking for Mood, just know that it is in a nondescript building on the 3rd floor.  There is no sign, unless you look up towards the 3rd floor windows.  This is what it looks like from the street:

See, no sign.

Here are some random interior shots of Mood, including the precious doggie, who was running around like a bat out of hell the whole time I was there:

Looking in from the elevator

Yes, lots of fabric (on two, large floors)

He was pretty cute!

And, finally, here are the fabrics I have chosen for my Koos coat:

I am going to use a dark chocolate binding to delineate the different fabrics. I wanted the colors to be the same, but the patterns and textures to be different. I’m hoping the brown binding will make it pop.

Included in the fabrics are a wool herringbone, a wool stylized plaid, a wool tweed that has sparkles, and a silk.

I am so glad I had the opportunity to visit the Garment District. It IS a bit overwhelming, so if you are planning a trip, make sure you have a list of fabrics you want to buy. Also, try to set aside at least two days for the district. The first day I just walked around in a state of total disbelief and confusion. It wasn’t until the second day that I could finally make some purchases.

An Attempt At Sewing

30 Mar

I am making an attempt at sewing my third JAM jacket.  This one will be Vogue 1036, this Sandra Betzina jean-style jacket:

I’m using this heavy stretch cotton, stylized paisley fabric that I got from Marcy Tilton a few years ago:

It’s difficult to tell on the computer screen, but the colors are dark brown, navy blue, and light gray.  I’m going to top stitch with a gray to somewhat match the gray in the fabric.

Most of the things I sew are less fitted than this jacket, so I’m learning a lot from this very slow process.  I always start by measuring the flat pattern at shoulder, waist, and hips.  I have very narrow shoulders, so normally I will choose the smallest size (usually an eight) to fit in that area.  Even then, I will have to make a narrow shoulder adjustment.  I use to do a full bust adjustment, but discovered that if I simply go out a few sizes under the armscye (usually to a 10 or 12), it works better for me.  For most of the knit tops I sew, those two adjustments are enough.

This time, I am working with princess seams, which is new to me.  I couldn’t decide whether to adjust the shoulder from the armscye, or to take in the princess seams.  I was worried that the 1 1/2 inch adjustment I had to make would put the princess seams too close to the shoulder seam if I adjusted at the armscye.  I posted this dilemma on Stitcher’s Guild, and AnnR came to the rescue.  She had made the same jacket and took in the princess seams to make the narrow shoulder adjustment.  So, that was the first adjustment I made.  I might add that Nancy Erickson, on the same post, thought that 1 1/2 inches would be too much to take in at the princess seam, and suggested I take half from the princess seam and half from the armscye.  Armed with these two opinions, I chose to take all from the princess seam.

Next, I pinned the front and back pattern pieces together and tried it on.  I noticed that there were two points that didn’t match, the bust point and the waist.  I’ve never noticed this before, but I knew I couldn’t ignore it (much as I would like to). The crazy thing was that the bust point was too low and the waist was way to high.  Ya gotta love body oddities.  So I had to split the pattern (both front and back pieces) in two different places to make the adjustment – just below the armscye to make the bust point adjustment, and just above the waist to make the waist point adjustment.

I’m almost embarrassed to show my pattern pieces after the adjustment, but here is the naked truth of my sewing life:
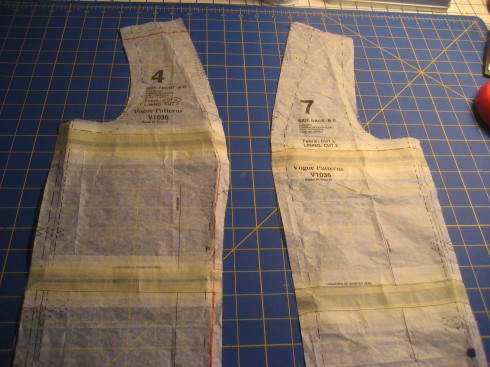
As you can see, I don’t always trace the pattern before I make adjustments, but I usually trace the final, adjusted pattern piece.  I figure, if my body changes, it’s better to go from the traced pattern piece that is always going to fit me through the shoulders, then I can just adjust the parts that are going to change with time.

So after I draw all of the cutting lines on the original pattern piece, with adjustments, I then cut all of the seam allowances off.  It’s just easier for me to see the pattern this way.  At this point, I deal with it as I would a BurdaStyle pattern.  I trace it off, then add the seam allowance with my Olfa rotary cutter with seam gauge.  If I were a really great sewist, I would thread trace the seams instead.  Maybe some day.  Here’s the final, adjusted pattern pieces.
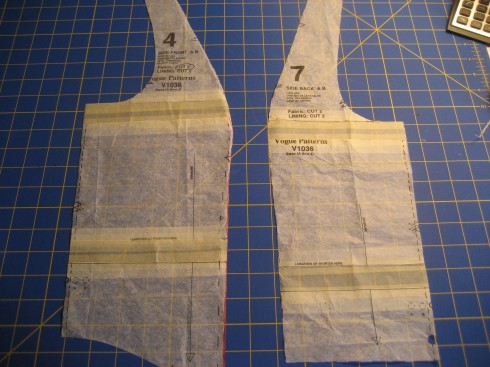
Of course, this is just the front and back side pieces.  I had to alter the front and back front pieces in the same way.

Now I’ll need to go through the facing pieces and see what needs fixing there.  More to come.

Ponte/Ponte Di Roma Knits

22 Jul

I have noticed that not all ponte knits are created equal.  Some have poly in them, some don’t.  Some have nylon, some don’t.  Some are called “ponte” and some are called “ponte di roma”.  So I wondered, what is a “ponte knit”?

Textile.com has this definition for “ponte di roma”:

“A fabric made in a double knit construction, usually produced in one color rather than color patterns. This plain fabric has an elastic quality with a slight horizontal line. The fabric looks the same on both sides.
Weft knitted, interlock based, double jersey structure. Means ‘roman bridge’ which is suggested by the arrangement of loops. The fabric looks the same on both sides.”

The Kohl Corporation has a fabric guide on their website that says this about “ponte knits”:

“Double-knit interlock fabric with stand-out stability and firmness that’s perfect for suiting. Ponte fabric has a subtle sheen and incredible durability.”

I honestly don’t think of ponte knit as a “suiting fabric”.  I am sure you can make a “suite” out of it, but it would be a very drapey affair, not a structured suite in the traditional sense.

I have four examples of ponte knit in my stash from three different fabric stores.  If I were going by these samples (which is not many), I would say there are two different types of ponte: one is 67% poly, 30% rayon, and 3% spandex, the other is 75% rayon, 22% nylon, and 3% lycra.

The one with the nylon has a sturdier feel, has better spring back, and is not as smooth or shiny as the one with poly.  It has slight horizontal lines running through it.  When I push my fingernail into the poly ponte, there will be a temporary bump left by the nail.  When I do the same thing with the nylon ponte, that doesn’t happen as much.

Waechter’s Silk calls their ponte with nylon “ponte di roma”.  My local fabric store just calls it “ponte”.  But, if textile.com is correct in saying that ponte di roma has a horizontal line, that would definitely be the ponte with nylon.  It has a distinctly different look to it that the poly ponte.

The term “ponte di roma” means Roman Bridge.  It refers to the arrangement of loops.  So, in the end, the difference between ponte and ponte di roma may be in the way it’s woven, not in the content.

Either way, the ponte I’m using for my October travel wardrobe is the ponte with nylon.  I’ve used the poly ponte previously in some TSW Trio Pants, and wasn’t completely happy with it.  I’m looking forward to working with the new ponte to see if there is a difference in the overall look and wearability.

Update on Summer Six-Pack

29 Jun

I have to be honest and say that I never really got inspired by my summer six-pack.  Not that I’m not using the pieces, just that they don’t work together as I had planned.  I didn’t finish, but this is what I made:

Katherine Tilton Jacket (Vogue 8654)

I took this picture when I was still trying to decide on the buttons, so they are just taped in place.  I really love this jacket, and will probably make another one, especially for winter.  It may be a little too hot for summer, since it really needs to be fully buttoned to look good.

I made the smallest size, and still had to take in the shoulders.  I used Ann Rowley’s narrow shoulder adjustment (see the link at right).  Here is what it looked like on this pattern:

This is the back adjustment.

You mark about two inches in from the shoulder edge, and about one inch below the armscye, draw the lines, cut, and move the pattern toward the center as far as you want to narrow the shoulders, truing the side seam.  I narrowed the shoulder by one inch, but next time I will go 1 1/2 to 2 inches.

Here is the front adjustment.

For this adjustment, you start about 2 inches from the shoulder edge, draw a line along the grain line to the armscye notch, and then to the seam line.  Cut the line all the way to the seam line, and then cut from the armscye to the notch, but not through it, creating a hinge.  Move the shoulder over the same distance as the back.  If you are going to do this, please read Ann’s instructions, as they are much more detailed.  This adjustment narrows the shoulders without altering the width of the underarm – great for narrow-shouldered, busty women.

Another project from the six-pack was Vogue 8397, View C (Marcy Tilton) and The Sewing Workshop Now top, made as a jacket (no buttons):

Both of these pieces are made from an Italian cotton I got from Marcy Tilton.  The fabric is gorgeous, it just doesn’t show in this picture.  It is very light and airy, and doesn’t wrinkle much for cotton.  I really love the pants.  They are so comfortable and cute, I think.  However, this is my second Now shirt, and definitely my last.  I really don’t like how it fits around the shoulders.  It’s a little bit of a drop sleeve, which is never good on my body.

The final piece in what is actually a 4-pack, is this Vogue 8582 (Marcy Tilton)top:

I love this top and think I will make it again and again (at least until tunics become obsolete).  It is flattering and comfortable.  I’m going to make it in a turtleneck for fall/winter, and wear with slimmer pants.

Now that I finally have all the supplies (had to order some cording online), I’m going to finish Elisha’s dress. More on that later.